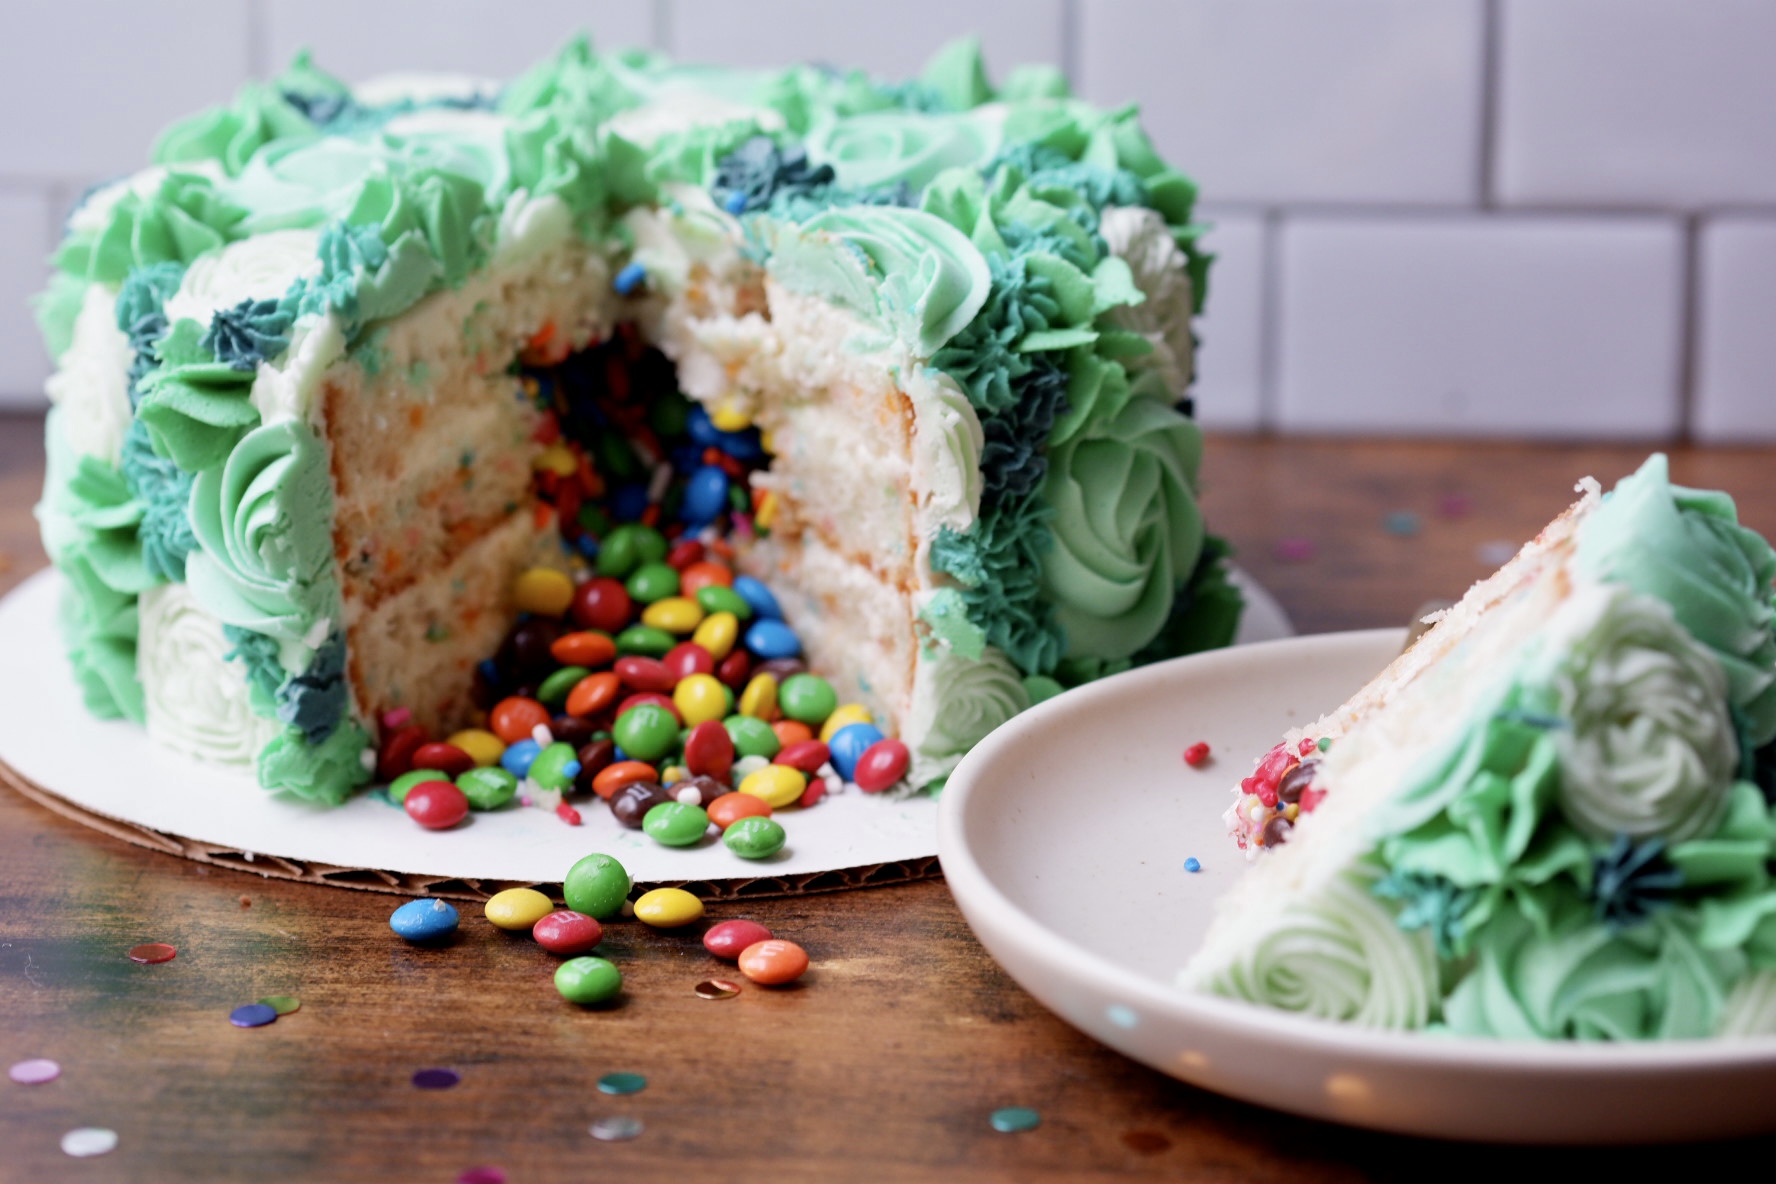
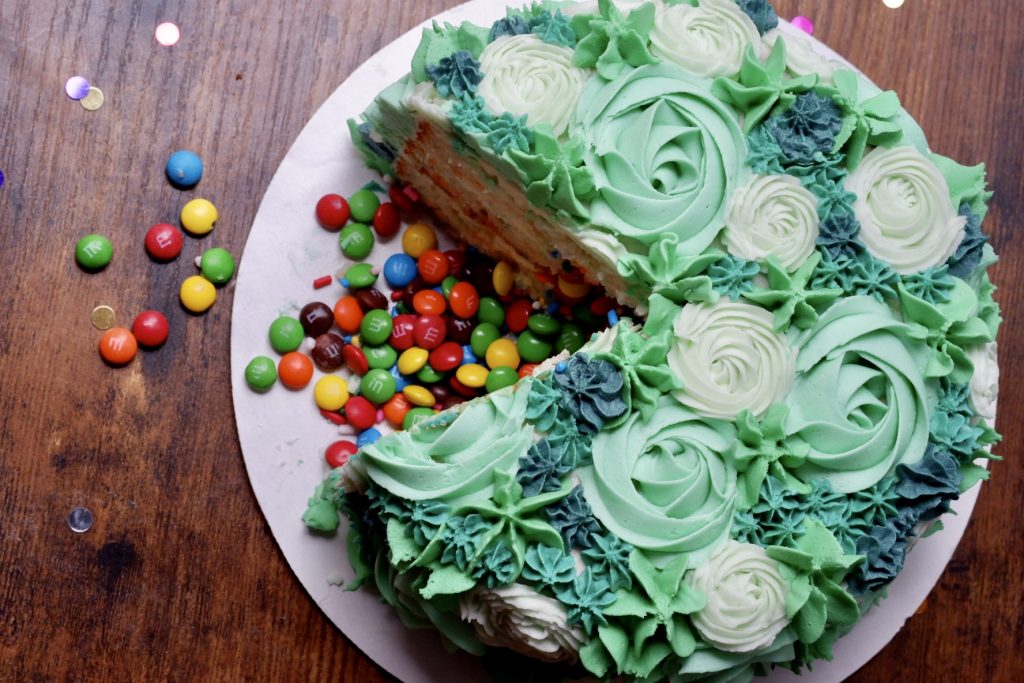
First and foremost, my blog officially passed 50,000 followers on Instagram – holy smokes! When I started Food by the Gram, I had no idea the community it could grow into, and I’m eternally grateful for the community that we’ve built together. I love cooking and baking for all of you, hopefully showing that a balanced lifestyle (ya know, WW friendly recipes and cake) is totally possible. To celebrate, I knew I had to make something epic – and this Confetti Explosion Cake fit the bill. It’s a fun (Food by the Gram colored) cake on the outside, and a confetti cake with exploding center inside. It’s a great cake to make for your next celebration (and I promise, it’s not as hard as it looks).

Components of confetti explosion cake
First things first – it’s what’s on the inside that counts. So lets talk about the inside of this insane cake.
The cake layers are my simple trick for a lightened up boxed-cake.
- 1 box cake mix of choice
- 1 cup filtered water
- 1 cup nonfat greek yogurt (I use Fage 0%)
Mix them all together in a mixing bowl, and divide equally between 2 well-greased 6 inch cake pans. Bake at 350 for 25-30 minutes, until a toothpick comes out clean. Let cool completely before frosting.
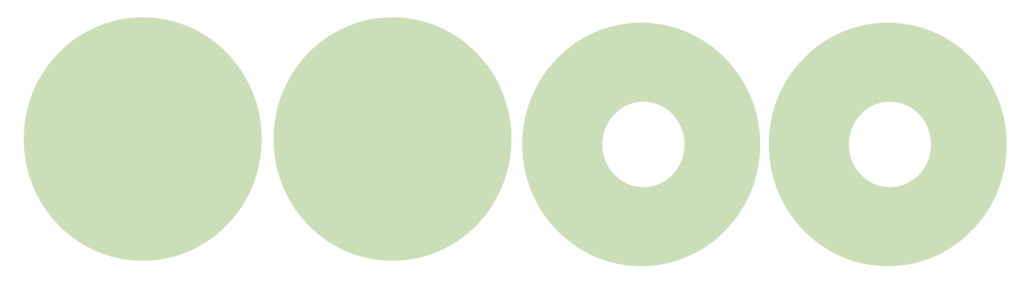
Carefully level off the top of your cake, and then cut each baked layers horizontally, creating two thinner layers from the one. The end result will be 4 thinner layers which you’ll use to build your cake.
Before frosting, you’ll set two layers aside, and you’ll cut the center out of the two other layers. You can do with by pressing a drinking glass through the layers or carefully cutting with a knife. This will create your central “cavity” which you’ll fill with sprinkles, candy, etc. You can use a mason jar or a glass to cut out two even holes (even a knife works if you’re accurate). The esult will be two layers that are regular, thin circles, and two that have the same hole cut out of the center, as below.
While your layers cool completely, you can make your frosting. Any frosting you like will work here (even store bought will be fine for the inside). I did a plain vanilla buttercream inside, and my vanilla almond buttercream for the outside. They marry well together for a sweet, slightly almondy finish. All in all, to frost this 6 inch cake fully, it took about 3.5 cups of frosting.
Assembling confetti explosion cake
Once you have cooled, cut layers and frosting ready, it’s time to assemble! Get your cake stand set up (I use a basic plastic one which comes with frosting tools) and put down a base. Put a small dollop of frosting down and put one of your solid cake layers (without the hole) down first. Frost that layer (ideally, avoiding the center where the cut out will be if you can). Next, stack one of the layers with the center cut out. You’ll then frost that layer, then add the other layer with the center cut out. Cover that layer with frosting, avoiding the center, and fill your central cavity with whatever you’d like.
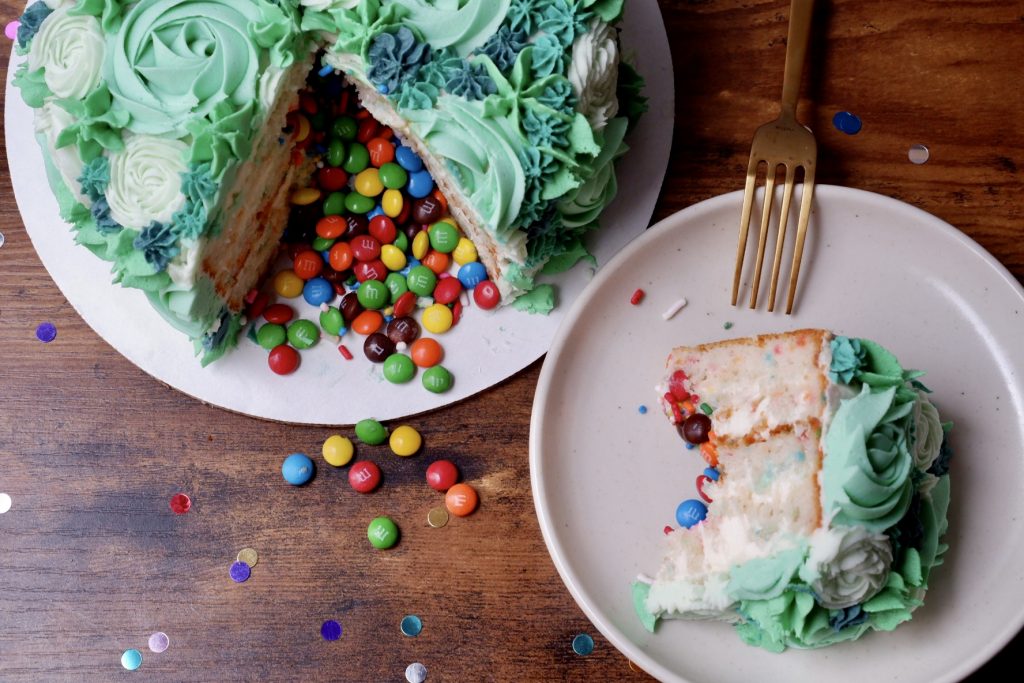
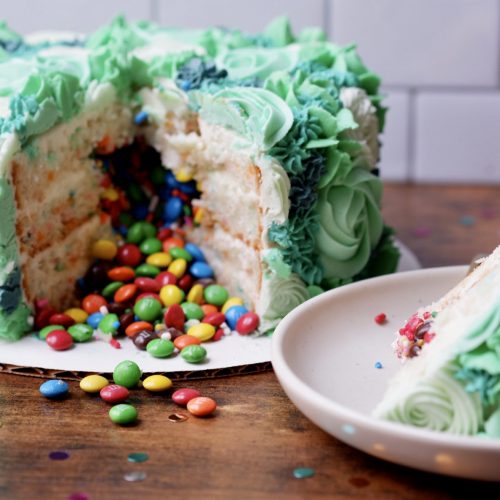
I filled mine with mini M&Ms and rainbow sprinkles for a fun, bright surprise! Lastly, top with the last solid layer, and crumb coat the entire cake but covering it in a coat of frosting. It’s ok if it isn’t perfect, but a good crumb coat will help ensure a cleaner final product.
Decorating the outside
Truly, you can decorate this however you want. I knew I wanted to use a color palette that’s similar to the branding of my website. That meant shades of teal/green, which I created using gel food coloring. When it comes to baking/ frosting, gel is the way to go. A little goes a lot way, and it makes for super vibrant, beautiful colors. Since I was using the same color in different shades, I started by dying the whole batch super light green, using that, then adding more color, using some, and so on.
Decorating the outside of this cake also only took two frosting tips- a large and small flower tip (1M and 4B if using Wilton). I highly advise testing your tips first on a paper plate or something, to get an idea of how to create the shapes you want.
Once the cake was crumb-coated, I piped on the largest flower elements first (use the large star tip and move in a swirl motion to create a big rose). In between piping, as I mixed frosting colors/changed piping bags, I would put the entire cake in the fridge to firm up. My next largest element was swirls using the small flower tip, which I put all over the cake, sometimes touching the other flowers, etc. Then, using the large flower tip again, I made little stars by gently pressing down as I squeezed frosting out of the bag, creating a little star. Lastly, using the small flower tip, I filled in any gaps with little stars using the same method.
Confetti Explosion cake
Equipment
- Stand Mixer
- Mixing Bowls
- 6 inch cake pans
- Rotating Cake Stand
- Piping Bags
- Piping Tips
Ingredients
- 15 oz Cake mix of choice, one full box
- 1 cup Water
- 1 cup Greek yogurt nonfat
- 2 cup Unsalted butter softened to room temperature
- 7 cups Powdered sugar
- 3 tbsp Milk or heavy cream
- 1.5 tsp Vanilla extract
- 1.5 tsp Almond extract
- 1/2 tsp Salt
- Gel food coloring
- 1/3 cup Candy/sprinkles for explosion center
Instructions
- Preheat oven to 350F. In a large mixing bowl, combine cake mix, water, and greek yogurt and whisk together until smooth. Grease 2 6 inch cake pans well, and divide batter evenly between the two. Bake for 25-28 minutes, until a toothpick comes out clean. Let cool completely.
- Once cooled, level the cake layers by carefully slicing off the domed portion on top so they're completely flat. Once flattened, slice each cake layer horizontally so as to split it into 2 thinner layers. Set two aside.
- Add butter into stand mixer and beat on medium-low speed until butter is whipped.
- Mix in vanilla extract, almond extract, and salt and beat until mixture is smooth, scraping down the sides as needed.
- Add powdered sugar 1/2 cup at a time, until fully incorporated. Add milk or cream and mix on medium speed to combine. To thicken thin frosting, add powdered sugar. If frosting is too thick, add a more milk or cream 1 tsp at a time.
- If you plan to color this frosting, you'll want to use a gel-based food coloring and add it at the end, after the frosting is mixed.
- Put down a cake board as a base and put a dollop of frosting on it to secure your bottom cake layer. Place board onto a rotating cake stand to make assembly.decorating easier.
- Put down one solid cake layer as a base and cover the top with frosting (leaving about a 2 inch diameter circle in the center unfrosted). Take two of the cake layers and cut a 2 inch diameter circle out of the center, which will help create a cavity for your candy filling. You can use a drinking glass to easily cut matching holes.
- Place one of the hollow layers (with the hole cut out) on top of the first layer, and frost the top. Add the next hollow layer on top, and frost the top. Fill the central cavity with your candy/sprinkle mixture of choice (I used mini M&Ms and rainbow sprinkles), top with final solid layer. Trim any loose ends/lumpy edges, and frost cake entirely. Crumb coat cake fully to prepare for decorating.
- Get two frosting tips- a large and small flower tip (1M and 4B if using Wilton). I highly advise testing your tips first on a paper plate or something, to get an idea of how to create the shapes you want. Once the cake is crumb-coated, pipe on the largest flower elements first (use the large star tip and move in a swirl motion to create a big rose). In between piping, as you mix frosting colors/change piping bags, put the entire cake in the fridge to firm up. The next largest element is swirls using the small flower tip, which you'll put all over the cake, sometimes touching the other flowers, etc. Then, using the large flower tip again, make little stars by gently pressing down as you squeeze frosting out of the bag, creating a little star. Lastly, using the small flower tip, fill in any gaps with little stars using the same method.
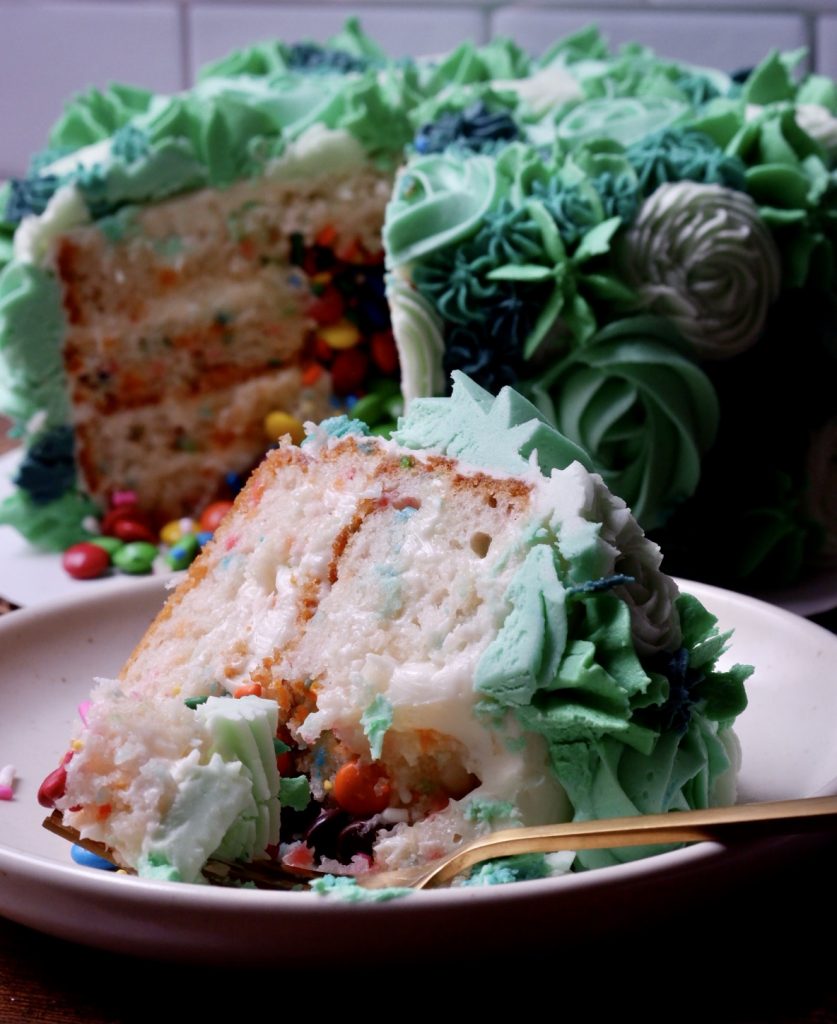
- Lastly, cut into the cake for an awesome confetti surprise! Enjoy! Store leftovers in the fridge and allow them to come to room temp by sitting out for 20 min before eating.

2 thoughts on “Confetti Explosion Cake”
This cake was a hit!! Everyone loved it and the subtle vanilla flavor of the cake mixed with the candy (I used mini m&ms and sprinkles) paired well. I even got orders for future cakes but i reminded everyone that I am an accountant and not a professional baker. LOL! Thank you.
I love that!!! So glad it was a hit! 🙂